Next.js Static Site Generation Practical Example
On this issue, we will be learning about how Next.js enables high-performant websites by pre-rendering every page by default.

This article is part of an entire Next.js series of articles that I am putting together to help you become a Next.js pro and start building blazing fast React apps.
💡 If you don’t want to miss out on any of the tutorials, signup for my newsletter by clicking here or head over to DailyDev.io for more.
On this issue, we will be learning about how Next.js enables high-performant websites by pre-rendering every page by default instead of having it all done by client-side JavaScript, like regular React apps usually do.
So let’s get started!
Pre-requisites
- Node ≥ 12
- React Basics
Quick Recap
Up to this point, we have been talking about the concept of pages, how to represent them within our Next.js project, and how to make them either static or dynamic so that Next.js would know how to render and match specific URLs to their corresponding React components.
We then fired up our development server by running npm run dev and waited for a browser window to pop up with our app running at http://localhost:3000. Great! 👍
But one thing we have not done is dive deeper into how Next.js is assembling those pages and serving them back to us when we visit some URL. And better yet, how the production build of our app differs from the development environment we are running locally. And this is really where Next.js shines.
Pre-rendering
“What is pre-rendering?” you might ask. Pre-rendering is the act of taking a page in the application and generating the plain HTML for it beforehand, instead of letting the client-side handle the bulk of the work. The HTML is then also shipped with minimal JavaScript code that will run in the client and that is necessary to make that page fully interactive.
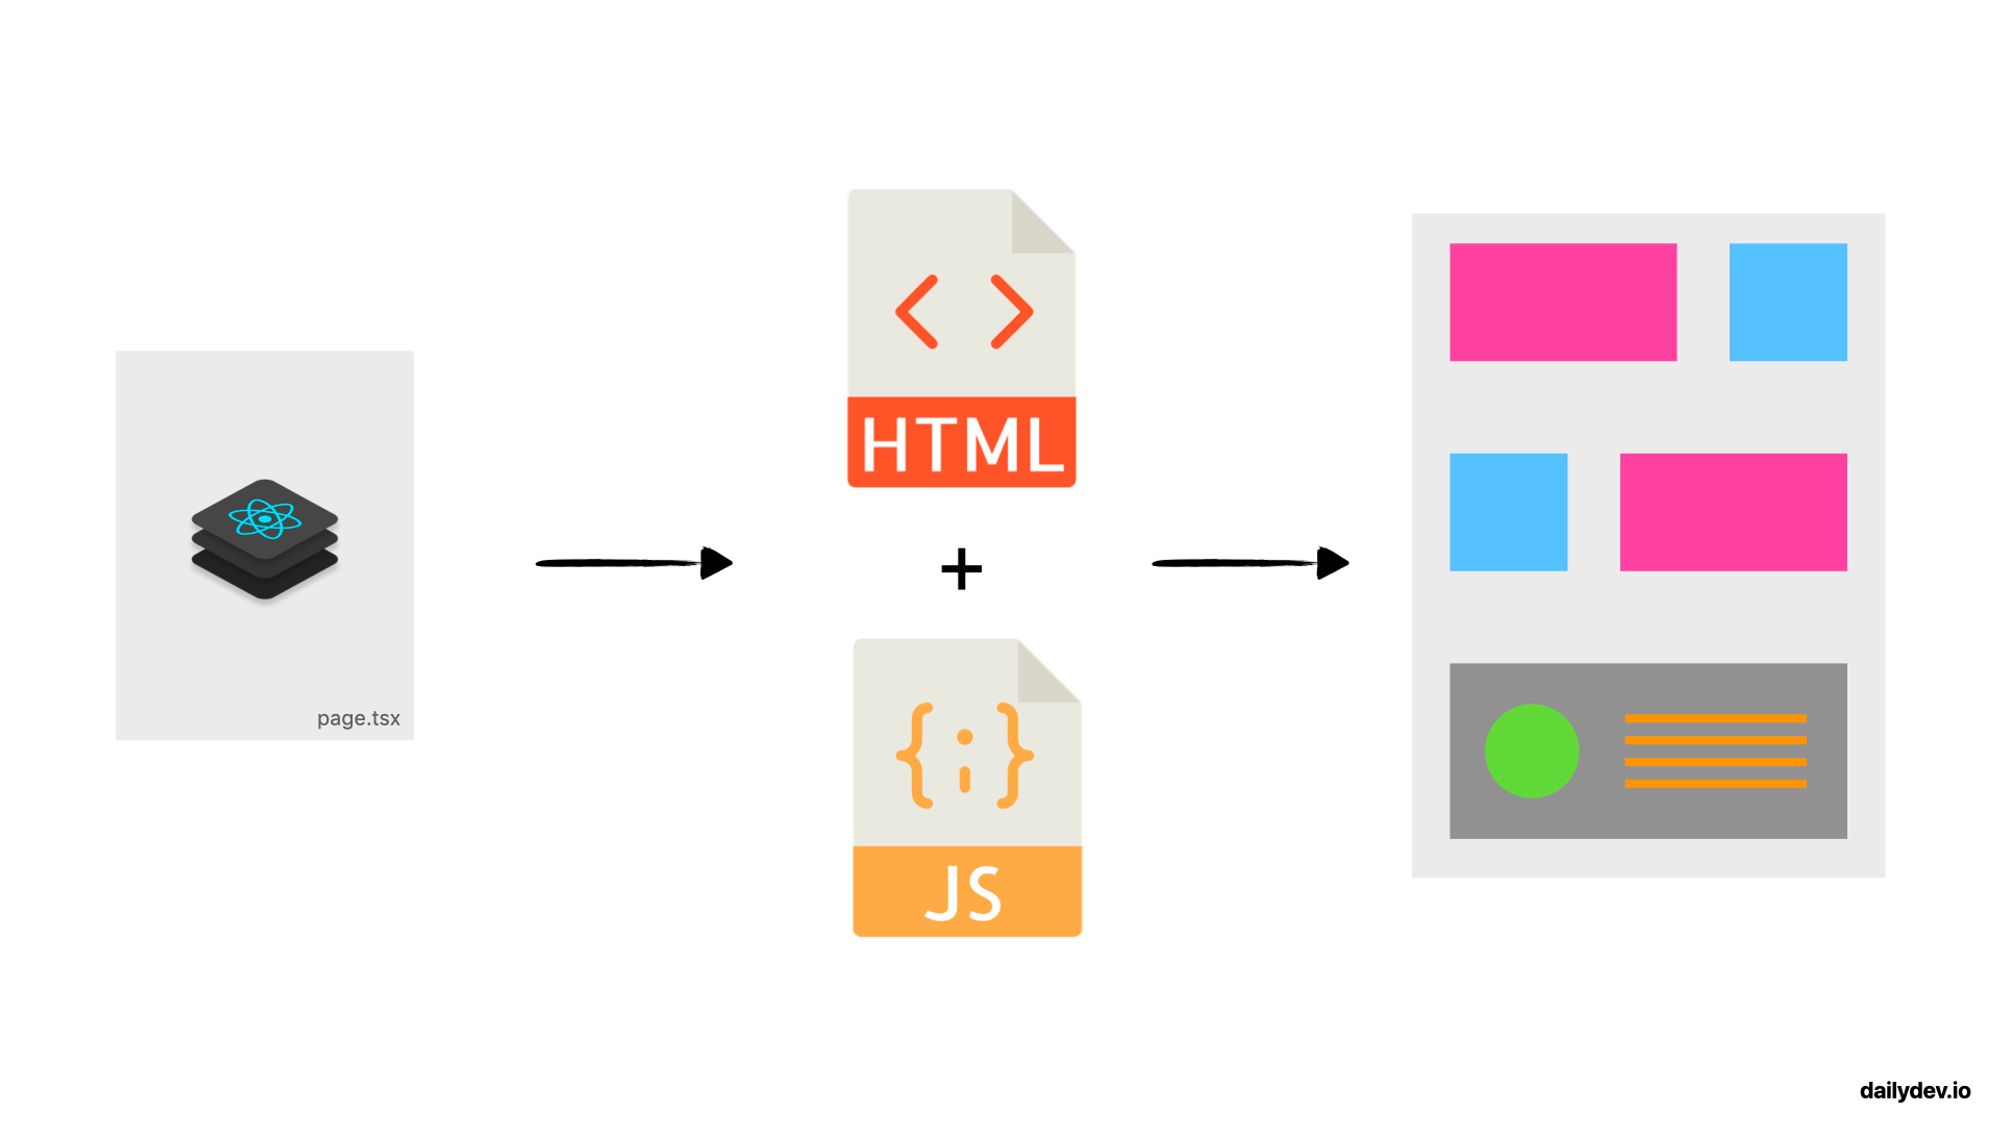
This process helps solve two of the main downsides normally associated with React apps and general Single Page Applications (SPAs):
- shockingly low Search Engine Optimization (SEO) capabilities, since all pages and transitions are handled by the client through JavaScript code and, therefore, not crawlable by Search Engines
- heavy loads for the clients as they have to download and run the entire application on the browser which quickly presented problems as the applications became larger and more interactive
How Next.js Handles Pre-Rendering
Next.js will pre-render every page, by default. And it can happen in two different ways, the difference is when it generates the HTML for a page:
- Static Generation: The HTML is generated at build time and is reused on every request for that page.
- Server-side Rendering (for another article): The HTML for a page is generated on each request.
Both of these options will offer the benefits we discussed in the previous section but they can be used for different use cases upon different needs and you can even develop hybrid approaches within the same application by statically generating most pages and server-side rendering others.
The best and most performant choice for serving a web application is by statically generating all the application’s pages since they can be easily cached in a Content Delivery Network (CDN) and boost performance by serving them closest to the requesting client. However, in some cases, Server-side Rendering might be the only option.
For now, let’s take a look at how you can achieve Static Generation within or dog app.
Static Generation
Using Static Generation, the HTML for a page is generated at build time when we run the next build command. That generated HTML is then served and reused whenever the page is requested.
There are two ways to statically generate pages, with or without data from external sources.
Static Generation without data
This is the most basic use case for a Next.js page, as it is the default behavior of the framework.
A simple component exported from a file in the pages folder that does not need to fetch any external data before being pre-rendered generates a single HTML file during the build time.
An example would be the individual dog pages we created in our first tutorial on Next.js Basic Routing:
Static Generation with Data
Then there is Static Generation dependent on fetching external data for pre-rendering. You can imagine two different use cases for needing to fetch external data for rendering pages:
- Your page content depends on external data.
- Your page paths (existing routes) depend on external data.
Scenario 1
We can think of an example within our doggo app where our page content will depend on external data. We made our page dynamic in the last tutorial, so all dogs are rendered by the same React Component. But all dogs have different information to be rendered on the page, therefore, the pages for each dog have distinct content.
Let’s assume the following snippet of our updated dog page:
To render each dog page with the correct data, we need to provide that specific dog data to our React Component.
To do this in Next.js, we will export an async function with a specific name, getStaticProps within the same page where the React Component representing the page is exported. This function will be called at build time when pre-rendering the page, and you can pass the necessary fetched data to the page’s props.
Scenario 2
Last time, we created a dynamic page within our app that enabled dynamic routes. With that, our app started responding to all requests for pages under /dogs/:id. But instead of only exposing routes for existing dog ids, our application is matching every id, so it will never return a 404 - Not Found under that route.
In a real-world scenario, this does not make much sense. We would only want to render and serve pages for specific and individual resources that exist within our database.
So our page paths depend on external data and should be pre-rendered. Similar to before, Next.js allows you to declare a specific function within your page component’s file, whose sole purpose is to return a list of paths that this dynamic page should be rendered on, getStaticPaths. This function also gets called at build time.
Now getStaticPaths and getStaticProps can work together to pre-render all pages for existing dogs, based on a single dynamic React Component.
Updating our Dog App
Now it is time to see this in action and power up our previously created dynamic page so that it can reach its full potential.
Creating a Dog Interface
Since we are using TypeScript to ensure type safety and easy development, we should make use of it and create an interface to represent our dog and facilitate its usage through the app.
Let’s create a new /definitions folder to store our definitions files and create a dogs.d.ts file with the following content, and now we have a simple representation of our dog object.
Creating our Dog Database
For simplicity, we will be creating a small in-memory structure to store our dogs and their information, so that Next.js can then access them and pre-rendered all the individual pages.
Let’s create a /db folder where we can store all our in-memory structures of data for ease of access. Inside we will create a dogs.ts file and populate it with some structure data of some dogs using our previously created interface.
Updating our Dog Page Component
We will make some updates to our page component in order for it to become 100% dynamic, namely:
- Remove the use of the Next.js Router: Next.js will be giving us all the necessary information through the component
props. - Create the
getStaticPathsfunction to generate a list of string-based paths that represent only our available dogs. - Create the
getStaticPropsfunction to fetch the respective dog based on the information received in theparams. - Update our page content to use the dog information present on the
dogprop is it now receiving fromgetStaticProps.
By the end, our React Component should look something like this:
Final Touch: Update Dogs Index Page
Just to end this on a high note, let’s update our dogs’ index.tsx page so that it will list all existing dogs and link to their individual pages.
The same principles apply here, but since it is only a single non-dynamic page, we only use getStaticProps and pass the dog list as props to the page so that it can render the list.
Final Result
By the end, your app should look something like this. Pretty neat! 😎
.gif?table=block&id=e311b653-adc3-4f64-a1fa-7ee12c360165&spaceId=a1132038-30f4-4c02-8dbb-44ea7cf0c715&userId=&cache=v2)
Final Remarks
To experience the full power and speed of Static Generation, don’t forget to run the build command (npm run build) followed by serving (npm run start) the generated files. This is how the pages would be served in a production environment and cached by some CDN.
Running the project in npm run dev mode will always build all pages on each request.
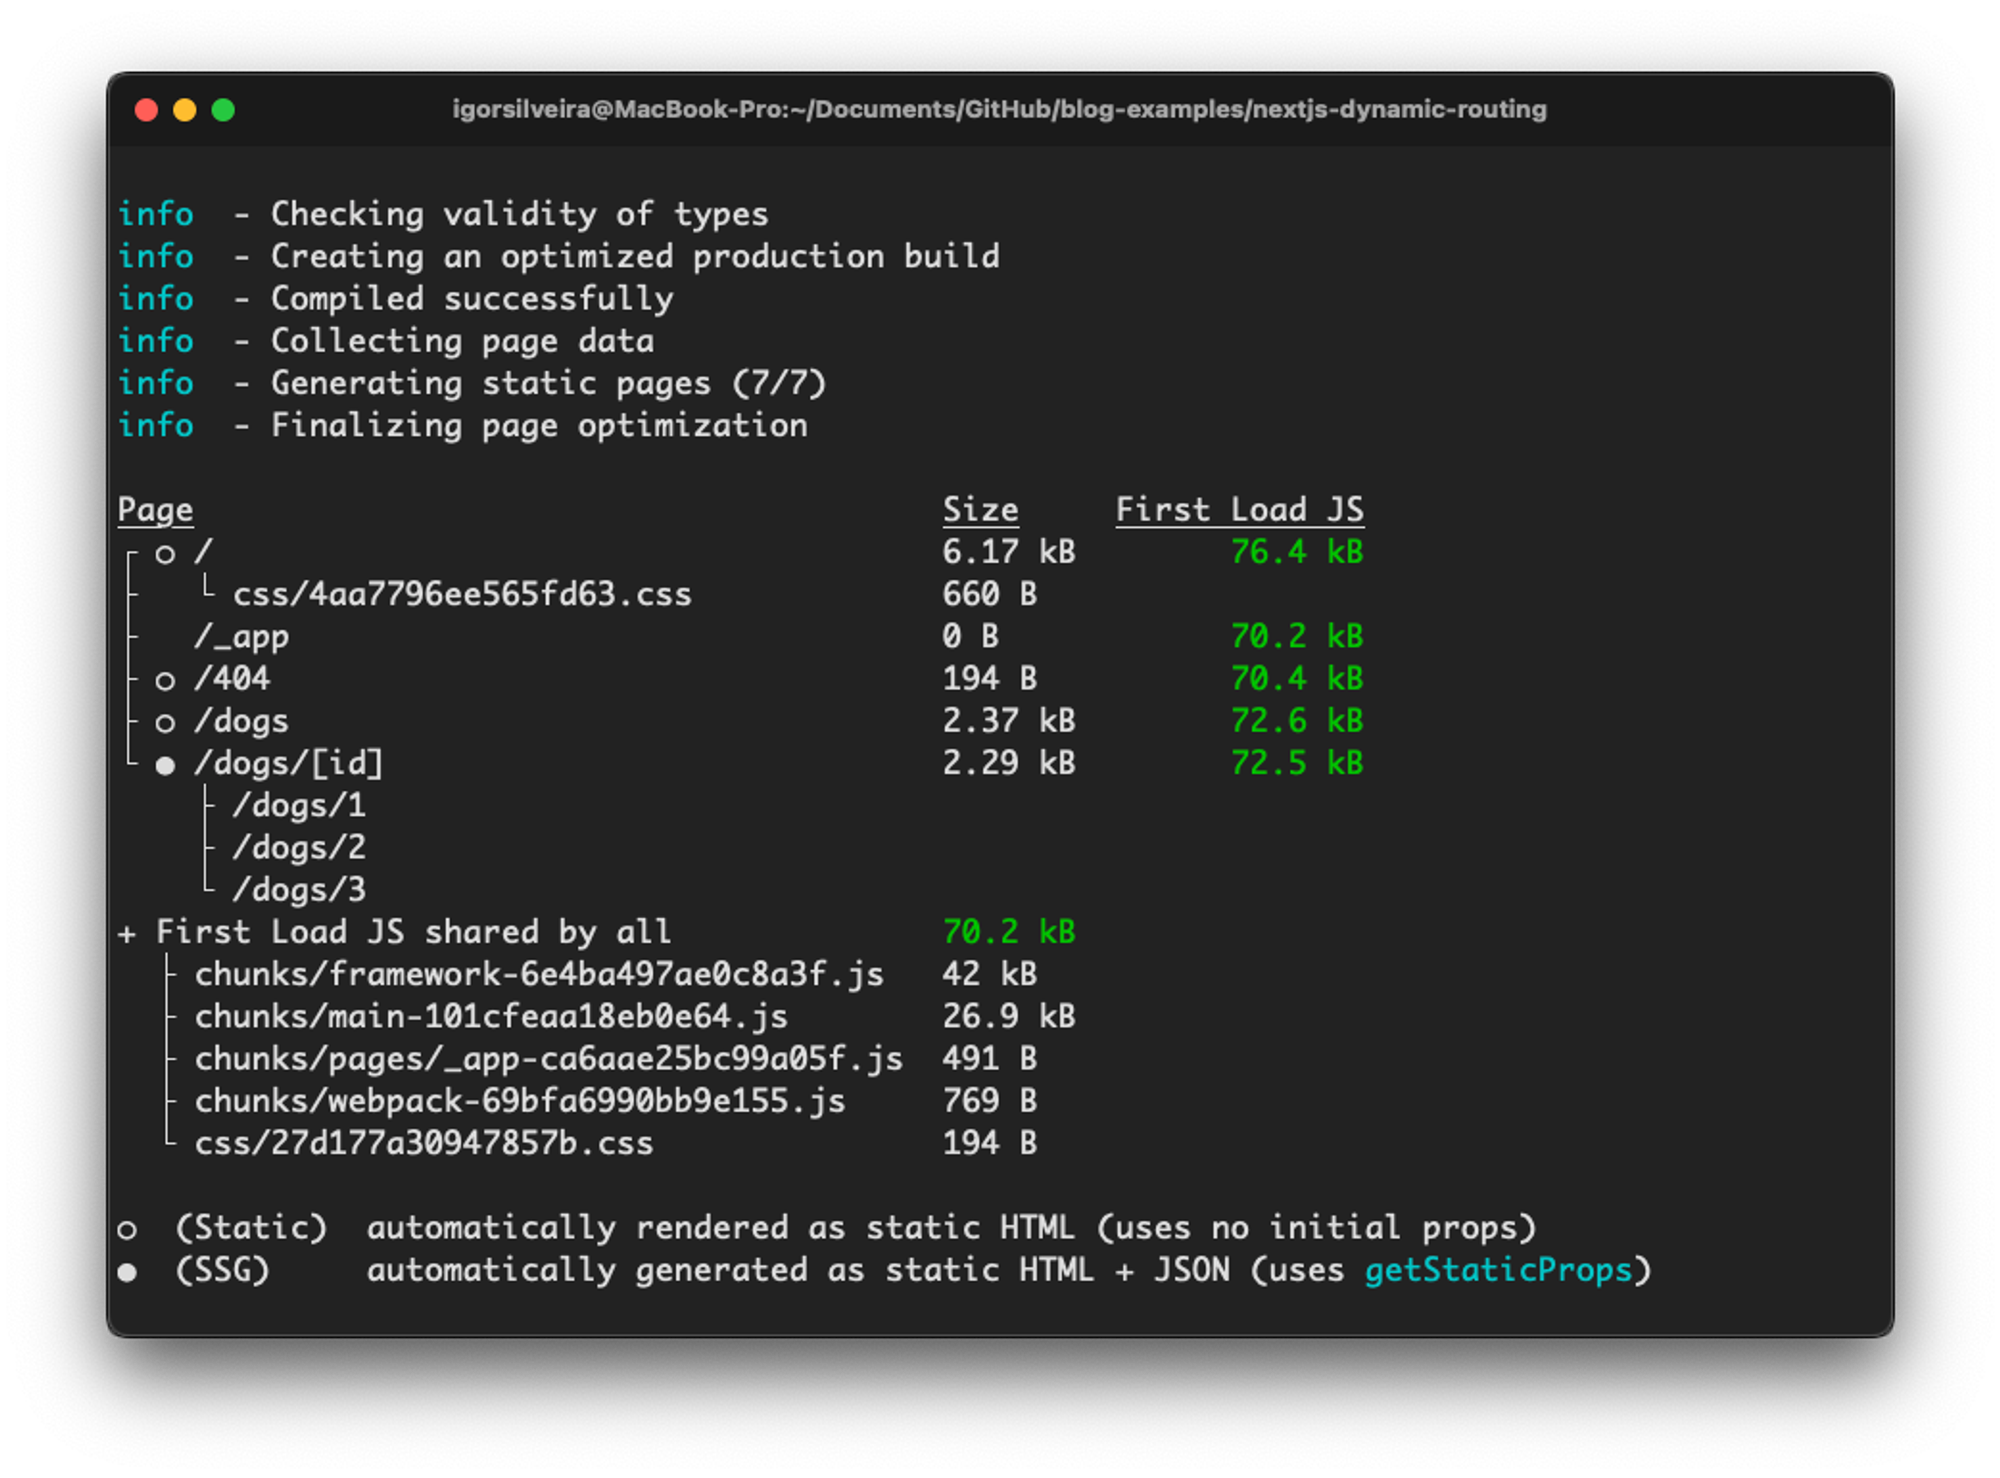
Notice how Next.js detected which pages were static and dependent on external data, generating exactly the routes defined by our in-memory database.
If you run into any trouble feel free to reach out to me on Twitter, my DMs are always open.
Next Steps: Keep an eye out for my following Next.js tutorials where we will go over much more in Next.js territory! If you don’t want to miss out on any of the tutorials, signup for my newsletter by clicking here.


